After you decide a WordPress Multisite is the right strategic move for your website, how do you create one? If you Google “How to create a WordPress Multisite?” or “How do I convert my WordPress site to a multisite”, you will find A LOT of articles. So then why did I write another one? Is it my newfound love of writing complete sentences instead of code? Am I doing it for the glory of the clicks and likes?
Maybe a little bit of both, but the truth is—the last time I converted a client’s website into a WordPress Multisite, I found that most of the how-to articles I read left me searching for more in-depth instructions or missing steps. I ended up bookmarking several sources and conglomerating them into my own how-to document. I hope sharing it eliminates some of the time consuming and confusing pieces of this process for others.
If you’re not sure what a WordPress Multisite is or how to use it to improve and restructure your current site, read our previous blog post that explains the pros and cons: What is a WordPress Multisite? Pros, Cons, and Steps to Set Up
Step One: Sync Up Your Website Environments
Most professional websites will have different environments—usually at least a production environment (your live website the rest of the Internet sees) and a development environment (a non-public version of your site you can test updates and fixes on before they go live). Make sure all your environments are synced up with the latest code and data from your production environment. After doing this, you can go through the steps below on your dev site to test it out before converting your live prod site. Make note of any additional steps or issues you run into so when you convert prod, everything goes smoothly.
Step Two: Back Up Your Website
There are two parts to this:
- Back up your WordPress database, which contains your posts and other data generated by your site.
- Backup your WordPress site files. Site files include your WP core installation, plugins, themes, images, files, JS, PHP, additional code files, and static web pages.
I can’t be more specific on these steps because your user access and site setup will determine how you do this. Our client’s hosting service was set up to run a full database backup of the production environment every day; for the WP site files, I already had access to them and just copy/pasted them into a backup directory.
Step Three: Deactivate Your Plugins
Go to Dashboard > Plugins > Deactivate All Plugins. You can also deactivate plugins through the WordPress CLI in the command line. Take note of plugins you might have deactivated already but want to keep on your site (a debugging tool plugin, for example). Make sure you don’t reactivate these later once the conversion is complete.
Step Four: Set Up Your Multisite Network
This is the fun (read: complicated) part:
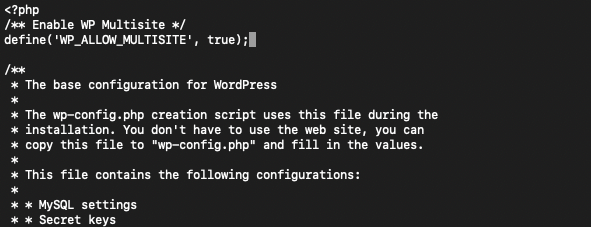
- In the command line or your FTP, go to wp-config.php and enable the multisite setting. Put the following code in this file and save.
/*Multisite*/ define(‘WP_ALLOW_MULTISITE’, true);
THIS IS THE ONLY LINE OF CODE YOU NEED TO ADD FOR THIS STEP
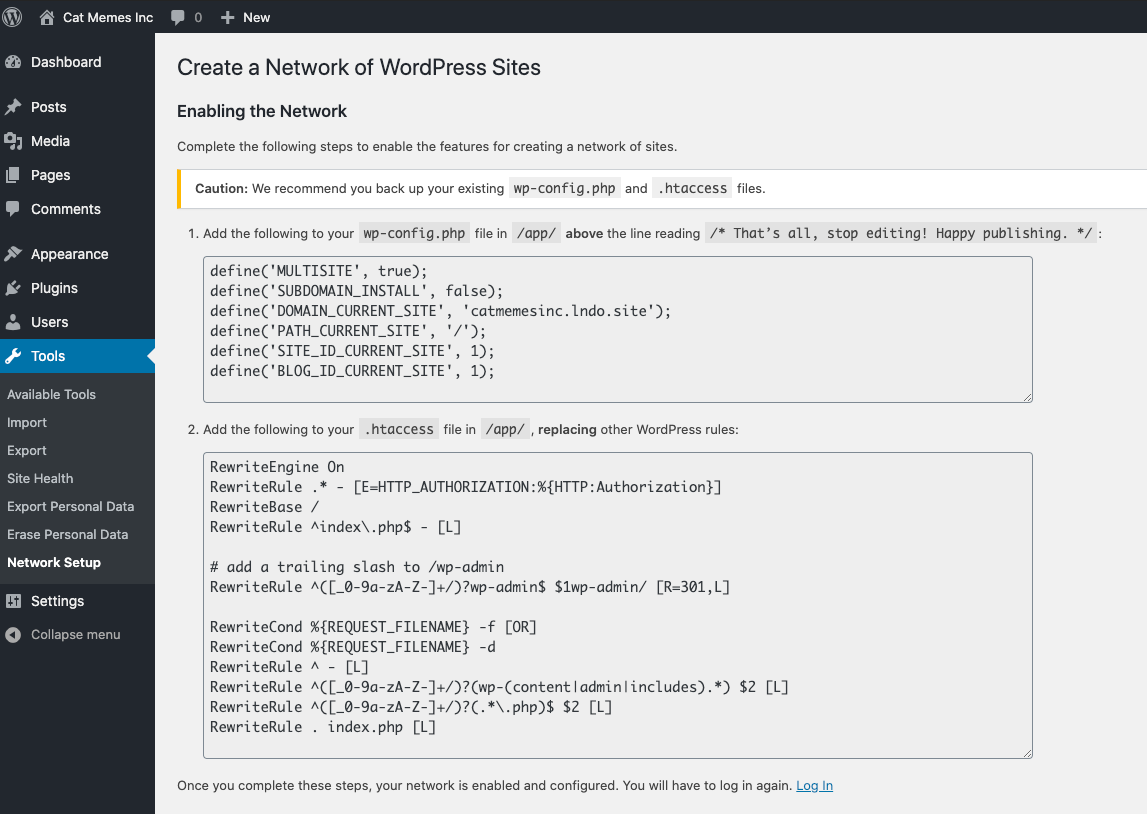
2. Go back to your site. You will need to log in again. Go to /wp-admin/network.php (or Dashboard > Tools > Network Setup).
- Select Subdomains or Subdirectories for your sites’ directory and URL structure. If you aren’t sure which to choose, find out what the difference is here.
- Enter the network title (ex. Cat Memes Inc.)
- Enter the Network Admin email (ex. catmemesadmin@emfluence.com)

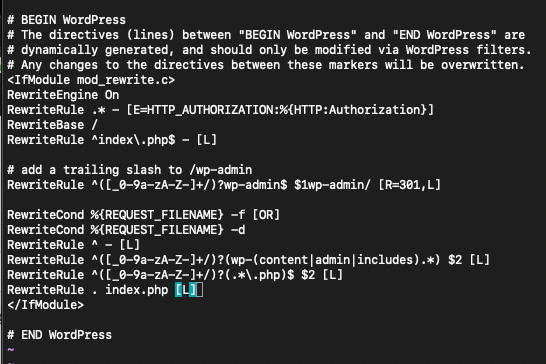
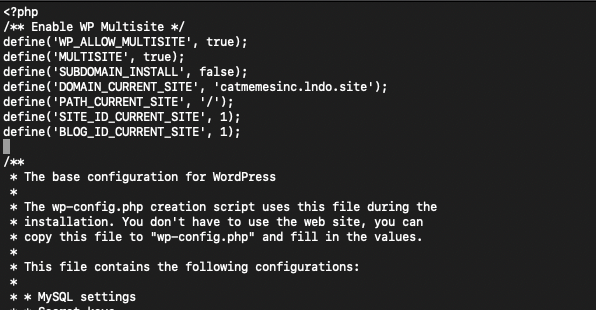
3. After clicking Install Network, WP will display generated code for your site that needs to go into the wp-config.php file and .htaccess file. Your site will tell you which code goes in which file. You can navigate to these files and edit them in the command line or FTP like you did in Step One. The sample code below was generated for my test site, but I’m including it to show you what it looks like.
If you have decided to use Subdirectories instead of Subdomains, make sure to set the Subdomain Install setting as “false”:
define(‘SUBDOMAIN_INSTALL, false);
4. Go back to your site. You will need to log in again. If you get any errors about the database, follow the directions. When setting up my test site, it asked me to put ‘define(‘WP_ALLOW_REPAIR’, true);’ inside the wp-config.php file. After the DB was repaired, the directions said to remove that line of code from the wp-config.php file. After completing those steps, I went to /wp-admin and logged in again. From the Dashboard, go to My Sites > Network Settings > Settings.
- Check option Allow new registrations: ‘User account may be registered’
- Check option Add New Users: ‘Allow site administrators to add new users to their site via “Users -> Add New” page
- Set Up Upload Settings. Most of these settings depend on your site’s specific needs.
Limit size of files uploaded to: XX MB
Max upload file size: XXX KB
Upload file types – make sure all the types you need are there. I needed to add the ‘xml’ file type for our client.
Enable administration menus for plugins if you want admins to have access to plugins on each site
5. Activate your site theme and plugins on the network. From here on out, when you want to update WP core, plugins or themes, you will go to My Sites > Network Admin and apply changes to the network. You can still go into the Dashboard of each individual site and activate/deactivate the plugins or themes that site needs. This ensures all the sites have access to the plugins and latest code.
- My Sites > Network Admin > Themes > Check name of the theme you want > Select Network Enable > Click Apply
- My Sites > Network Admin > Plugins > Select Network Activate > Click Apply
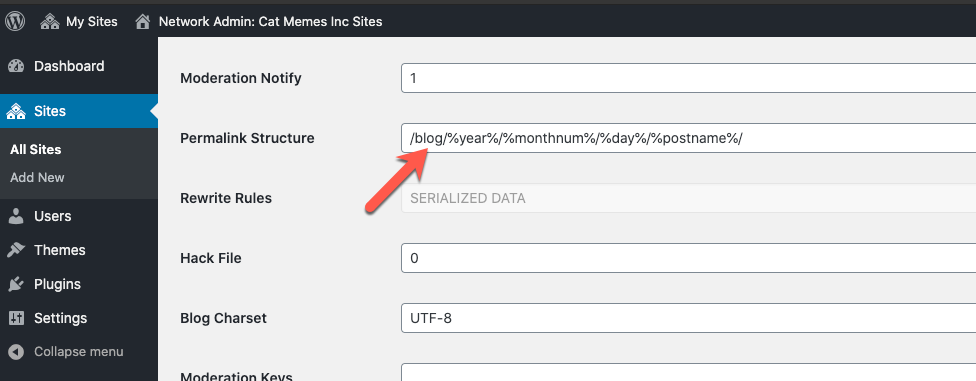
6. Change the Permalinks structure. The default URL structure for your pages will have ‘/blog’ in it.
For example, the default structure for my test site’s pages was https://catmemesinc.com/blog/%year%/%monthnum%/%day%/%postname%/ but I changed the structure to be simply https://catmemesince.com/%year%/%monthnum%/%postname%/. So now a sample page might be https://catmemesinc.com/2021/01/i-can-haz-cheezeburger-meme.
My Sites > Network Admin > Sites > Select Edit Your New Site > Scroll down to Permalink Structure and remove the ‘/blog’ and add anything else you want.
Step Five: Check Your Network and Shell Site Settings
It will take some getting used to, but you now have multiple dashboards for your WP multisite. To make changes to all the sites on the network, go to the Network Dashboard. You can get there through My Sites > Network Admin > Dashboard or by going to /wp-admin/network/index.php. Anything you do here will effect ALL sites. This Network Dashboard does NOT have a visible site to view or visit. It’s simply the control panel for your multisite.
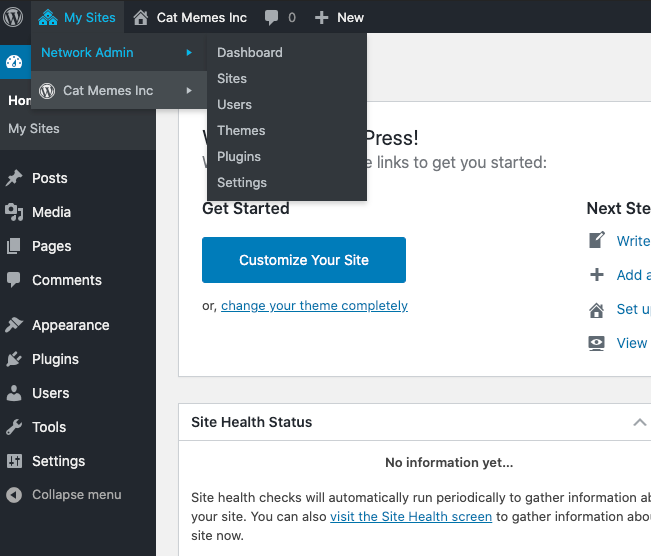
To go to each individual site’s dashboard, go to My Sites > Hover over a site > Select Dashboard. Here you can control the theme, content types, users, user roles, plugins, etc. that the site has activated.
- If you’re using a Content Delivery Network (CDN), you’ll want to check that your setup is still correct for the network under My Sites > Dashboard > Performance
- Under My Sites, you should see your shell site listed (ex: Cat Memes Inc). You can go to the dashboard for this individual site and check your plugin settings, user roles, etc.
- A tip to keep admin pages from loading slowly: By default, WordPress multisite networks check the used file storage for each site in admin page loads. This can cause slow admin page loads in large load balanced environments where shared file storage is slow. You can disable this check by setting the database option to: ‘upload_space_check_disabled=1;’ . This has to be done directly in the database, so it will need to be completed by someone with database access.
Step Six: How to Create More Shell Sites
Our first shell site is Cat Memes Inc. We might want to make other sites to showcase more specific memes or maybe we have a child company that creates dog memes. We can create another shell site called Grumpy Cat Memes. And another one called Dogs Meme the World.
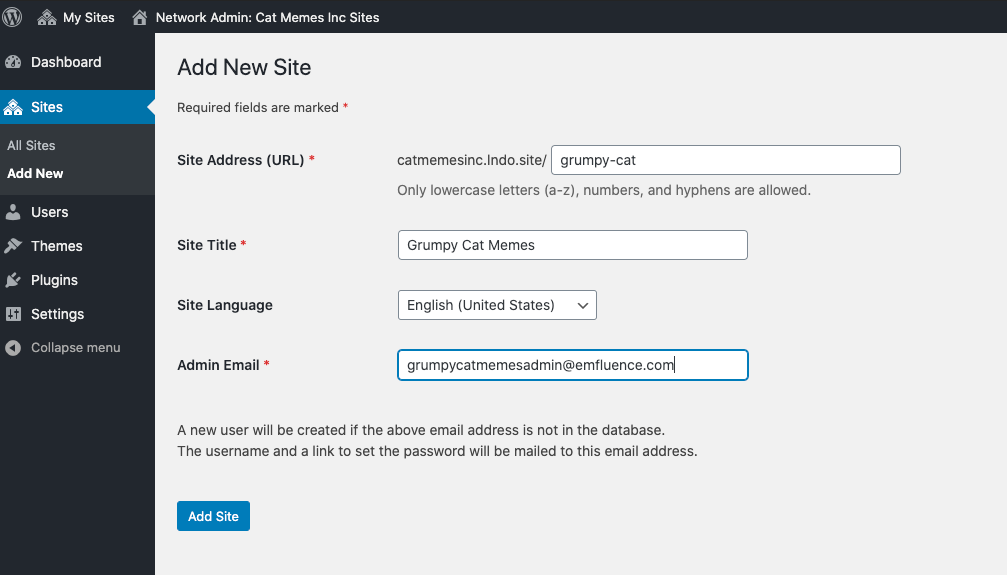
To create a new site, go to My Sites > Network Admin > Sites > Add New. From there, you can fill out all the necessary info like your site’s URL, site name, and admin email. You will not have to add the network multisite code in WP files again. The network setup only needs to be done once. After you create the new site, go to My Sites > Network Admin > Sites > Find your new site > Edit. Here you can change the URL and set up users, themes, and settings like the Permalink Structure. Once your site is set up, you can go to its dashboard and set up user roles, theme, plugins, etc. as mentioned before. You can also go to your first shell site and use the Export/Import tools to migrate specific posts and media you need for your new shell site.
Enjoy your multisite universe!